Many people admire the elegance of gold-leaf adorned chocolates, often wishing to replicate the stunning effect at home. With the right techniques and tools, you can elevate your confections effortlessly. In this guide, you’ll discover how to apply gold leaf to chocolate like a seasoned professional, ensuring that your treats not only taste divine but also look magnificent. Follow these steps to impress your guests and indulge in the luxurious charm of gilded chocolate!
Key Takeaways:
- Ensure your chocolate is fully set and cooled before applying gold leaf to achieve the best adhesion and presentation.
- Utilize a pair of tweezers or a small brush for precise handling of gold leaf, preventing unnecessary tearing and allowing for better placement.
- Work in a controlled environment to avoid humidity and static, which can affect the quality and appearance of both chocolate and gold leaf.
The Materials: Choosing the Right Chocolate and Gold Leaf
Selecting the right chocolate and gold leaf can significantly elevate the overall aesthetic and taste of your chocolate creations. For the best results, opt for high-quality chocolate that complements the luxurious appearance of the gold leaf. Consider textures and flavor profiles to ensure they harmonize with each other, as this combination will enhance the visual appeal and taste of your finished treat.
Selecting Quality Chocolate: Dark, Milk, or White
Your choice between dark, milk, or white chocolate plays a pivotal role in the success of your gold leaf application. Dark chocolate’s rich and intense flavor pairs exquisitely with gold leaf, adding sophistication. Milk chocolate offers a creamy sweetness that can create a delightful contrast with the luxurious sheen of the gold. White chocolate, while sweet and milky, provides a beautiful canvas for gold leaf, allowing it to stand out vibrantly.
Understanding Gold Leaf Grades: Real vs. Imitation
Gold leaf comes in two primary categories: real and imitation. Real gold leaf, made from genuine gold, adds an authentic touch and safety when consumed, while imitation gold leaf—a composite material—can be less expensive but lacks the same luxurious appeal. The grade of gold leaf is determined by the purity level, typically ranging from 22K to 24K for edible options. For the best results, choose edible gold leaf that meets safety standards to create an impressive presentation.
Imitation gold leaf may emit a metallic taste or even leach artificial colors, affecting your chocolate’s flavor and aesthetics. On the other hand, real gold leaf not only provides an opulent look but also boasts a neutral flavor, allowing your chocolate’s rich notes to shine through without interference. Different grades can influence the gold’s color and thickness; for example, 24K gold leaf appears more vibrant and reflective compared to its lower-karat counterparts. Always check packaging for edible certification to ensure a safe and delightful experience.
Prepping for Perfection: Preparing Your Chocolate
Before applying gold leaf, your chocolate needs a flawless finish. Start by ensuring your chocolate is of the highest quality, as the texture and shine play a significant role in how the gold will adhere. Proper preparation is key; any imperfections on the surface can disrupt the illusion of opulence that gold leaf aims to create. This stage is all about refining your chocolate base to embody a professional standard that not only showcases the gold but enhances the overall elegance of your creation.
Melting Techniques: Ensuring a Smooth Base
A smooth chocolate base begins with melting techniques that maintain the chocolate’s integrity. Opt for a double boiler or microwave to gently melt your chocolate, being careful not to overheat it. Aim for a temperature around 120°F (49°C) when using a microwave, stirring every 15 seconds to achieve an even melt. Using high-quality chocolate will also enhance the final results, making the gold leaf application more seamless and beautiful.
Cooling to the Ideal Temperature: The Sweet Spot for Application
After melting, allowing your chocolate to cool properly is vital. The ideal temperature for applying gold leaf is between 80°F and 85°F (27°C to 29°C). At this temperature, the surface is still slightly tacky, creating the perfect adhesion for the gold leaf to stick without sliding off. A surface that is too hot will cause the gold to melt away or slip, while a too-cool surface might lead to difficulties in attaching the gold leaf.
| Temperature Range | Gold Leaf Application Outcome |
| Above 85°F (29°C) | Gold leaf will slip and may not adhere properly. |
| 80°F – 85°F (27°C – 29°C) | Ideal for perfect adhesion of gold leaf. |
| Below 80°F (27°C) | Smooth surface may not allow gold to adhere effectively. |
Maintaining the right temperature not only affects adhesion but also the overall finish of your chocolates. If your chocolate cools too much, it can become unmalleable, resulting in uneven patches when you apply the gold leaf. A thermometer is a good investment to precisely control the temperature and guarantee a perfect surface that enhances the luxurious appeal your chocolates deserve.
| Scenario | Advice |
| Chocolate too warm | Allow to cool more before gold leaf application. |
| Chocolate is getting too cool | Reheat gently while monitoring the temperature. |
| Gold leaf not sticking | Check chocolate temperature; may need slight reheating. |
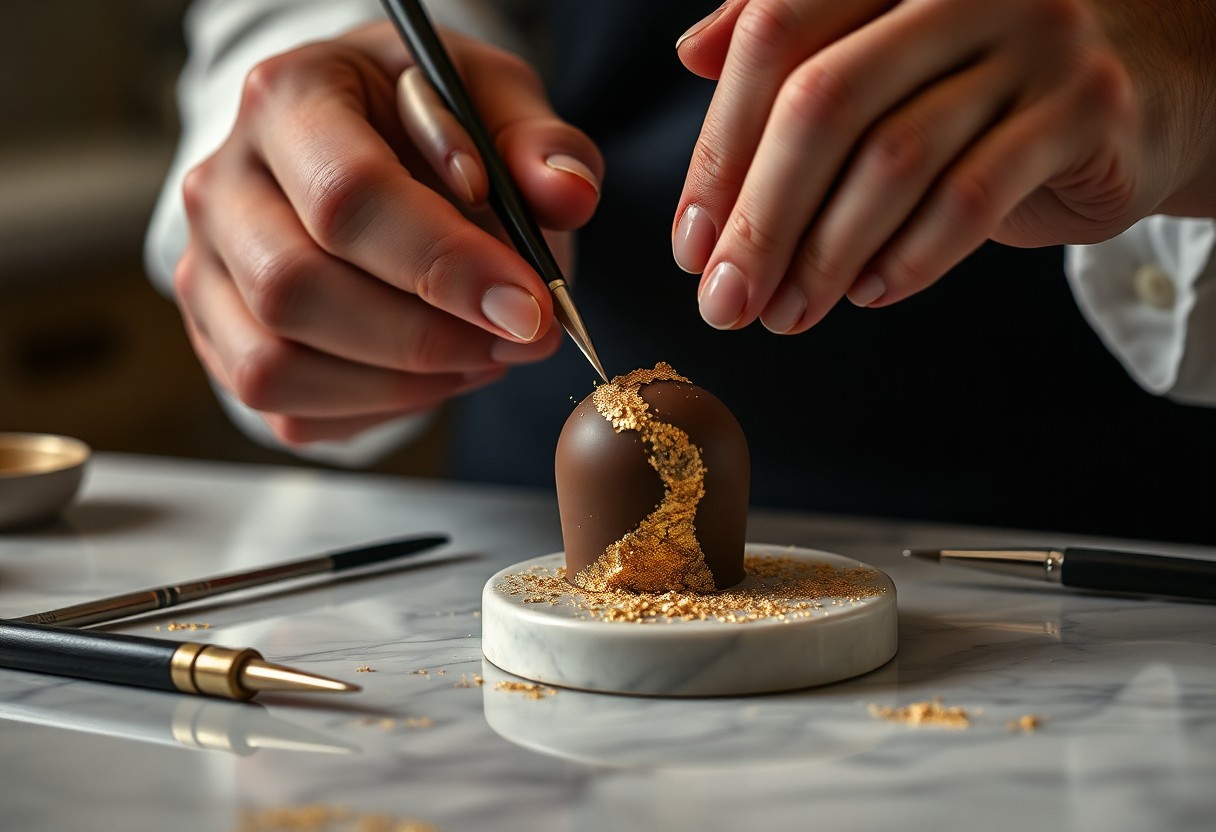
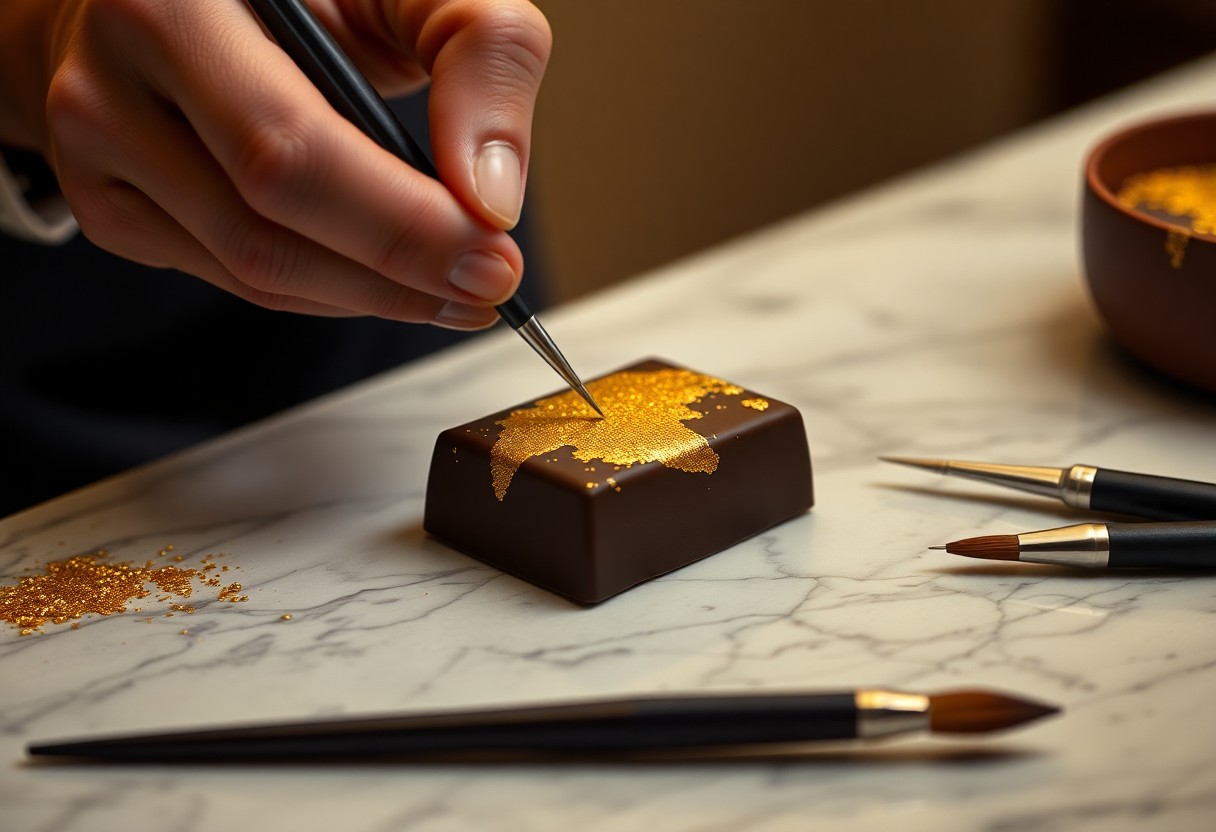
The Art of Application: Techniques for Flawless Coverage
Perfecting the application of gold leaf requires finesse and precision. Maintaining an even surface on your chocolate is key, allowing the gold leaf to rest seamlessly. Techniques such as using a soft brush to gently apply and smooth the leaf can help avoid tearing. Practice makes perfect; don’t be discouraged by initial imperfections. Experimenting with different styles of application can result in unique and stunning visual outcomes!
Tools of the Trade: Brushes, Tweezers, and More
Your toolkit for applying gold leaf should include specific items that enhance accuracy. A soft, dry brush allows you to delicately position the gold leaf without disturbing its fragile nature. Tweezers are imperative for picking up and placing the gold leaf onto intricate designs. Additionally, a pair of scissors can be handy for trimming the gold to fit your chocolate’s shape perfectly.
Step-by-Step Guide: Applying Gold Leaf with Precision
To apply gold leaf with precision, start by preparing your workspace to ensure cleanliness and minimize the risk of dust. Gently cut your gold leaf into manageable pieces. Using tweezers, pick up a piece and lightly touch the chocolate’s surface to adhere it. Next, use your brush to smooth the gold onto the chocolate, working from the center outwards to eliminate air bubbles. Finally, inspect your work for any uneven edges or gaps, and touch up as needed for a seamless finish.
Step-by-Step Application Summary
| Step | Detail |
| 1. | Prepare workspace and ensure cleanliness. |
| 2. | Cut gold leaf into manageable squares or shapes. |
| 3. | Use tweezers to lift and place gold leaf onto chocolate. |
| 4. | Smooth with a brush, working outwards to prevent air pockets. |
| 5. | Inspect the application and touch up as necessary. |
Each step is vital in achieving a professional-looking finish. A stable surface helps in applying gold leaf smoothly, while minimal handling prevents tearing. Use the tweezers delicately to transfer the gold leaf onto the chocolate, ensuring not to create any creases. After brushing, keep an eye out for any spots requiring additional coverage, as even the subtlest touch can enhance the overall appeal of your confectionery. Mastering these steps will elevate your chocolate artistry to new heights!
Creative Combinations: Flavor Pairings and Presentation Tips
Combining flavors can elevate your chocolate creations, making them truly exceptional. Enhance your gold-leafed chocolates with unique pairings such as sea salt with dark chocolate, citrus zest with milk chocolate, or spiced caramel with white chocolate. Consider contrasting textures by incorporating crispy rice or crushed nuts, and never underestimate the visual impact of garnishes like edible flowers or vibrant fruit. The thoughtful playing of flavors and textures will not only tantalize the palate but also create a stunning visual feast.
Enhancing the Experience: Flavor Infusions with Gold
Working with gold leaf allows you to elevate both flavor and aesthetic appeal. Pairing your chocolate with ingredients like fruity liqueurs or spicy chili can infuse additional sensations, while the gold leaf accentuates these rich combinations. You might try a raspberry-infused ganache topped with gold for a refreshing finish or a chili-dark chocolate bite to surprise the palate. Each bite becomes an experience, tantalizing your senses and making your dessert not just a treat but a statement.
Displaying Your Masterpiece: Putting the Glam in Presentation
Presentation matters significantly in the world of gourmet chocolate. A stunning plate or presentation box can enhance the overall experience. Focus on elegant arrangements that allow the gold leaf’s shine to stand out. Use clean, simple backgrounds like white plates to draw attention to your chocolate’s beauty. You can also incorporate decorative elements such as fancy wrappers, colored cacao dust, or artistic drizzles of complementary sauces. The way you showcase your gold-leafed chocolates can turn them into a centerpiece at any occasion, elevating your dessert from ordinary to extraordinary.
Common Pitfalls: Avoiding Mistakes That Ruin Your Finish
In the world of gold leaf application, staying aware of potential missteps can save you from disastrous results. Issues such as improper handling, incorrect temperatures, and lack of preparation can detract from the luxurious effect you aim to achieve. By honing in on these common pitfalls, you can ensure a stunning application that highlights your chocolate creations instead of overshadowing them.
Temperature Traps: What to Watch Out For
| Temperature Consideration | Tip |
|---|---|
| Too hot | Gold leaf may melt or warp, ruining the finish. |
| Too cold | Chocolate can harden too quickly, leading to mishandling. |
| Optimal range | Aim for 70°F to 75°F (21°C – 24°C). |
Gold Leaf Handling: How to Prevent Tears and Wrinkles
When applying gold leaf, the way you handle it can make a significant difference in your final presentation. Using a soft brush or tweezers helps to gently lift the sheets without causing tears or wrinkles. Make sure your hands are dry and clean, as moisture or oils can cling to the delicate material. Practice applying the sheets in less conspicuous areas until you feel confident; this builds your skill without risking your primary design.
Additionally, working in a calm and undisturbed environment is crucial. Avoid drafts and movements that could disturb the gold, causing it to shift. Applying gold leaf in a controlled setting, away from strong lighting and humidity, empowers you to focus on every detail and yields polished results. Experimenting with different tools, like small spatulas or brushes, can also enhance your precision as you gain confidence in your technique.
Conclusion
Summing up, applying gold leaf to chocolate can elevate your desserts to a luxurious experience. By ensuring your chocolate is properly tempered, using tweezers for precise placement, and working in a controlled environment, you can achieve a professional finish. Practice your technique and don’t hesitate to experiment with different chocolate varieties and designs. With patience and attention to detail, you’ll create stunning confections that impress your guests and make any occasion feel special.
FAQ
Q: What type of gold leaf is best for applying to chocolate?
A: It is recommended to use edible gold leaf specifically designed for culinary use. Look for 23-karat or 24-karat gold leaf, as they are made to be safe for consumption and will provide a stunning appearance when placed on chocolate.
Q: Can I apply gold leaf to any type of chocolate?
A: Yes, you can apply gold leaf to various types of chocolate including dark, milk, and white chocolate. However, for the best visual contrast, using white or dark chocolate can enhance the gold leaf’s shine and overall appearance.
Q: How do I ensure the gold leaf adheres properly to the chocolate?
A: To ensure proper adhesion of the gold leaf to the chocolate, apply it when the chocolate is still slightly warm, about 85-90°F (29-32°C). This temperature helps the gold leaf stick better. Alternatively, you can lightly brush the chocolate with a small amount of edible glue or a simple syrup if the chocolate is already cooled.
Q: Is there a specific tool I should use to handle gold leaf?
A: Yes, using a pair of tweezers or a gold leaf brush is ideal for handling gold leaf. These tools allow for precision when placing the delicate gold leaf on the chocolate, preventing it from tearing or sticking to your fingers.
Q: How should I store chocolate with gold leaf applied?
A: Store chocolate with gold leaf in a cool, dry place away from direct sunlight, as heat and moisture can damage both the chocolate and the gold leaf. It is best to keep the chocolate in an airtight container to maintain its freshness and prevent the gold from tarnishing.